I like to watch the TV show "No Reservations" with Anthony Bourdain (a chef) who travels to different places and eats all their weird foods. He likes weird food, and while I don't really like Tony as person that much I do enjoy watching the places he goes to and the foods they eat. Food is a big draw for me when traveling. Anyway I was watching the one about Sweden and he meets up with these two hardcore male skiers who knit hats on their free time! They even say it's become sort of a "side business." It's so weird and they describe the meaning of the Swedish word "Lagom" which does not exist in any other language. My husband is of much Swedish ancestry (from MN big surprise) and some people are put off when they first meet him because he doesn't talk much, he's calm most of the time, and does like adventure as well. I think this lagom stuff has really helped me make sense of my husband in more ways than one.... Then late Tony goes off to make a handblown glass but they don't show the whole thing. While Anthony may not enjoy the knitting and glassblowing parts of his travel I really did and thought I would share a clip for you all
Also wanted to share this WONDERFUL recipe a HotDish MN friend of mine, Jenny, emailed me this week. I tried it last night and it's awesome. I've had sweet potato soup before, but not like this. The garnishes are absolutely perfect mixed with it and I never would have thought chopped apples or mint would be so good with sweet potato. I think the hubby and I have a new favorite to add to the soup rotation!
Roasted Sweet Potato Soup with Curried Apples
1 tsp olive oil
2 1/2 pounds sweet potatoes
1 medium onion, halved and sliced
course salt and pepper
1 red bell pepper, ribs and seeds removed, thinly sliced
2 jalapeno peppers, peppers, ribs and seeds removed, thinly sliced
3 garlic cloves, coarsely chopped
1/2 cup sherry
4 cups vegetable broth
2 tsp white-wine vinegar
1 tsp honey
1/4 tsp curry powder
1 small tart apple, cored & finely chopped
1/4 cup plain yogurt
2 tbsp chopped mint, for garnish
1.Preheat oven to 400 Roast potatoes for 1 hour, turning once. When cool enough to handle, scoop cooked potatoes out of skins. Discard skins(your earth friendly self might add them to your compost collection).
2. Meanwhile, in a large soup pot, heat oil over med. heat. Add onion, season with salt and pepper, and cook, stirring occasionally, until soft and caramelized, about 20 minutes. Add bell pepper, jalapenos, and garlic; cook for 5 min. Add sherry, sweet pot., and broth; stir to combine. Bring to boil, reduce to simmer, and cook for 20 minutes.
3. Working in batches, puree soup in a blender (i used my immersion blender for this step). Combine batches in a clean pot. The soup should be thick. (If you prefer thinner soup, add water or broth) Taste and adjust seasoning.
4. In a small saucepan over med. heat, bring vinegar, honey, and curry powder to a boil. Add apple; stir for one min. and remove from heat. To serve, ladle the soup into warm bowls, add a spoonful of apples, a spoonful of yogurt, and a sprinkle of mint, and think of your Minnesotan friend Jenny while you enjoy this savory sweet potato soup.
Feb 29, 2008
Feb 26, 2008
It's my husband's Birthday & he's Crazy about making beer
Jarrod's bday today! we already went out this weekend but I am making him some cupcakes today too. He loves german chocolate cake and carrot cake so I am making both in cupcakes. Jarrod didn't even like beer until we moved to WA. Now he loves all those super dark ones like Porter and Stout, taste like coffee to me and they are chewy. But he likes them. We only meet in the middle on beer like Ambers, Browns and sometimes a wheaty hef.
Jarrod got a bug about making beer around Christmas time when we had no money. SO I ordered him a book about making it that had a lot of good reviews for being a good beginner book. Well he just couldn't stop talking about it! I told him that this week we could go to the brewery supply store and get him set up but he just couldn't be patient and two weeks ago he ran into town and bought everything. Pretty much cleaned us out so this beer better be good.
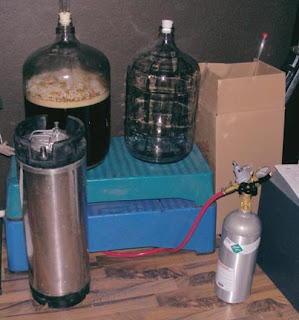
Right now he is making and Amber ale. He got all the stuff you need to make it and then store in a "keg" thing he bought too. Some people bottle it but he heard it was a pain in the ass. The first few days it's all totally gross looking and bubbly and it's basically brewing itself after it's been cooked. He keeps it in this huge bottle and it was all gross looking. But the third day or so it calmed down (it was all swirling around and bubbling for three days) and he filtered out the gross crap and put into another bottle for 3 weeks. Right now it's just sitting here in the office. Here is a picture of it the first couple days when it was all gross looking.

So I must be getting back to my aprons. I have gotten a lot of positive response, but also custom orders that I need to finish. I am not a Walmart sweatshop and it takes some time for me to make these! I do like making them though.
Jarrod got a bug about making beer around Christmas time when we had no money. SO I ordered him a book about making it that had a lot of good reviews for being a good beginner book. Well he just couldn't stop talking about it! I told him that this week we could go to the brewery supply store and get him set up but he just couldn't be patient and two weeks ago he ran into town and bought everything. Pretty much cleaned us out so this beer better be good.
Right now he is making and Amber ale. He got all the stuff you need to make it and then store in a "keg" thing he bought too. Some people bottle it but he heard it was a pain in the ass. The first few days it's all totally gross looking and bubbly and it's basically brewing itself after it's been cooked. He keeps it in this huge bottle and it was all gross looking. But the third day or so it calmed down (it was all swirling around and bubbling for three days) and he filtered out the gross crap and put into another bottle for 3 weeks. Right now it's just sitting here in the office. Here is a picture of it the first couple days when it was all gross looking.


SO since he's spoiled his bday already I am NOT getting him anything else!
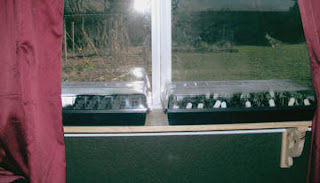
On another note I've started my seeds for garden already. Last year I started them in March and some of them weren't ready. But I have realized that I cannot get a lot of heirloom seeds, like tomatoes, to grow here. They grow but they never get a long enough season, or hot enough to get much fruit if any. So avoid disappointment this year I've bought only seeds for a short, cool season instead. But now since I've done that I am wondering if I have started them too early? I have no idea but I guess I will find out. Most I won't be able to plant until May 1st or very near that date. The rest have to planted directly outside since they don't transplant well. Jarrod built this little shlef on the window though so my starts can get some light while they aren't under my grow lights taking turns since I only have one.

So I must be getting back to my aprons. I have gotten a lot of positive response, but also custom orders that I need to finish. I am not a Walmart sweatshop and it takes some time for me to make these! I do like making them though.
Feb 20, 2008
WHEW! The shop is open!
After much prep time and hard work I have now opened the second shop. I guess I will see what you think :)
www.HotDish.etsy.com
Feb 17, 2008
the finished pendant

This is the first project we finished in class, here is the pendant all shiny and pantina. It was hard to photograph though cause it's so shiny it was reflecting a lot of light!


Sorry I don't have so much to post this week I've been busy working on the new store and I plant to have up and running by next week at the very latest! I am just waiting on some new lighting to come in the mail so i can take nice pictures with true colors. I can't wait and I hope you will like the new store!
Feb 7, 2008
What Goes On In the Beginning Metal-working class @ Pouncing Rain
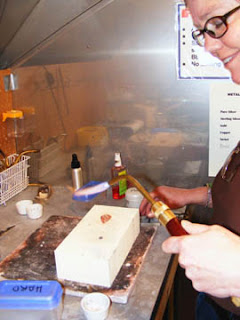
I mentioned in a previous blog that I am currently taking a beginning metal-working class at a local studio Pouncing Rain ( http://www.pouncingrain.com/ ). It is VERY fun and there are 6 women in the class with me as well as our teacher Judith.
I took my camera to class with me to take pictures and share them with you so you can see what goes on in there! This is week 4 of the 6 week class. We are finishing up our first project which can be a pendant or a pin.
So far we have learned how to saw, snip, shape, texture, mold, anneal, solder, pickle, file, and polish with metal. We were given copper and brass to start our projects with. Some people have chosen to go with very intricate designs for their 1st projects too! I did not, mine was simple but I enjoy looking at what everyone else is trying out. Here is our teacher demonstrating how to apply solder to a small crease by using the "pick" method.
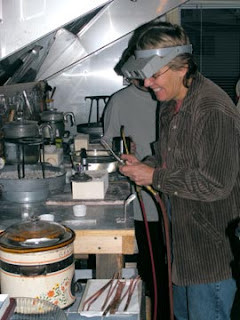
The studio we use used to be a restaurant. So we do all torching under the giant fan that is where the stove used to be in the kitchen. Then in the next picture she is demonstrating how to use a tube cutter. I think that's what it was called? Something like that.
..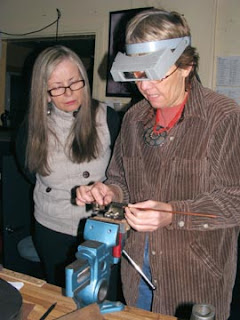
Kath of the soon to open MyEmmaGrace etsy store (http://www.myemmagrace.etsy.com/ ) is peeking over her shoulder. I have met some wonderful artists in this class. Some with their own websites, some that have their own etsy shops and some that are learning about Etsy from us who have some experience!

This is Deb (http://www.waterscolors.com/ ) working on her pendant with a torch. Some of these pics didn't show the flame for some reason, but it's there! It looks like she is using the pick method to apply solder to her piece.
This is Allie of the Etsy shop GlassAllie ( http://www.glassallie.etsy.com/) firing the torch to apply some silver balls to her piece. I think? Or maybe the bail. She can tell you!
Now I probably should have said this earlier but most of us don't dress up for class! We all dress down because of the messes we can make and the class starts at 9:30am so we don't really care about looking good, especially when folks like myself that live 20 min away have to get up extra early to make it on time. I just grab what looks warm and clean!
The picture of the backside shows the bail I made and attached in class that day too. This bail is hidden so you won't see it once it's on the chain.
I took my camera to class with me to take pictures and share them with you so you can see what goes on in there! This is week 4 of the 6 week class. We are finishing up our first project which can be a pendant or a pin.
So far we have learned how to saw, snip, shape, texture, mold, anneal, solder, pickle, file, and polish with metal. We were given copper and brass to start our projects with. Some people have chosen to go with very intricate designs for their 1st projects too! I did not, mine was simple but I enjoy looking at what everyone else is trying out. Here is our teacher demonstrating how to apply solder to a small crease by using the "pick" method.

The studio we use used to be a restaurant. So we do all torching under the giant fan that is where the stove used to be in the kitchen. Then in the next picture she is demonstrating how to use a tube cutter. I think that's what it was called? Something like that.
..

Kath of the soon to open MyEmmaGrace etsy store (http://www.myemmagrace.etsy.com/ ) is peeking over her shoulder. I have met some wonderful artists in this class. Some with their own websites, some that have their own etsy shops and some that are learning about Etsy from us who have some experience!

This is Deb (http://www.waterscolors.com/ ) working on her pendant with a torch. Some of these pics didn't show the flame for some reason, but it's there! It looks like she is using the pick method to apply solder to her piece.

This is Allie of the Etsy shop GlassAllie ( http://www.glassallie.etsy.com/) firing the torch to apply some silver balls to her piece. I think? Or maybe the bail. She can tell you!

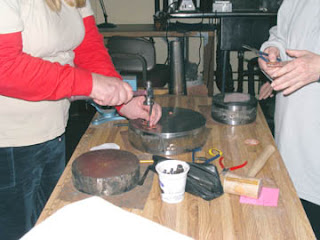
This is Kathy and Deb playing with the stamps and snips to create their works of art. There are certain hammers you use for the stamps, and the metal itself and even when you shape it you need to use certain hammers. Everything stays in good shape that way. This is Judy showing us how to use the big polisher for our 1st polishing of our pendants.

I learned fast that the polisher is really strong and will rip your metal right out of your hands if you don't have a good grip on it! First she applies the polish to the wheel and then you can polish. We have to wear masks because you don't want to breathe in the particles that fly around and the goggles are because of how easy it can take your metal from you and fly right in your face!
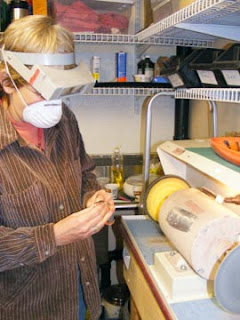
Here I am working with the small polisher on my piece. My goggles were useful though cause someone next to me had their metal ripped out of their hands and fly right by my head a couple times! Funny though, I jump in the air when people light the torches or sometimes when they pound things, but this thing flying past my head didn't stir me. I am so weird.

Now I probably should have said this earlier but most of us don't dress up for class! We all dress down because of the messes we can make and the class starts at 9:30am so we don't really care about looking good, especially when folks like myself that live 20 min away have to get up extra early to make it on time. I just grab what looks warm and clean!
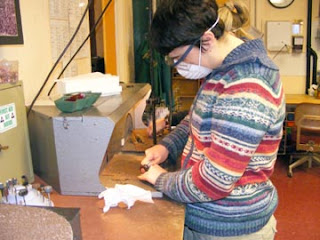
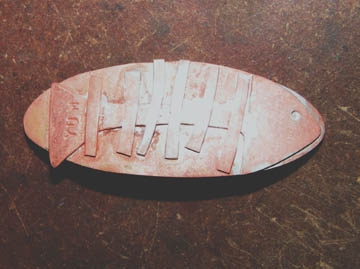
Here is what my pendant looked like before I started polishing it. It can really dirty while you are working on it that's why it looks so raggedy. The bottom part is brass and the top(fish bones) are copper. When I finally polished it it was so SHINY I couldn't believe it was the same thing. But I didn't take any pics of it yet being shiny because when I was done with the 1st polishing i applied a patina to it to darken the parts I want to stand out more, like the word "yum" on the tail. Once it's finished I will post a pic though!

The picture of the backside shows the bail I made and attached in class that day too. This bail is hidden so you won't see it once it's on the chain.
SO... this is my class! I wanted to share for any of you who might be wondering about it or are interested in it yourself. This class has taught me so much and helped me get over my fear of using the torches and tools that are necessary for this kind of work. I am still nervous, but I am not afraid to use them. What's funny is none of the other women seemed scared at all! I was the only wuss. :)
Subscribe to:
Posts (Atom)